IronWorker CaaS Worker: Celery Setup
In this article, we will tell you the steps you need to set up Celery for IronWorker.
Celery is a tasks worker in python; it can work with Redis, RabbitMQ, or other Message-Queues.
To implement Celery worker server, you need to have a machine with python and Redis installed on it, or you can use Cloud RabbitMQ.
The following steps will show the basic steps need to write your first Celery Worker server code.
Achieve Cloud Elasticity with Iron
Speak to us to find how you can achieve cloud elasticity with a serverless messaging queue and background task solution with free handheld support.
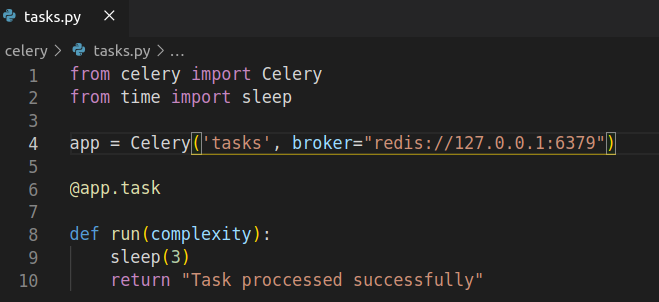
2. Write the Code
Will write a simple code that defines the task function, and will run celery worker as the server configured to use local redis.

3. Run the Celery worker
To start the server run inside the python virutalenv $ celery -A tasks worker --loglevel=inf0

4. Queue a message
On another terminal select the python virutalenv, and call the function “Run.delay([MESSAGE])}
Celery decorator adds “delay” method to the function for running in asynchronous mode

Iron.io Serverless Tools
Speak to us to learn how IronWorker and IronMQ are essential products for your application to become cloud elastic.
5. Notes
Celery is another lightweight tool for rapid implementation of Worker system if you are familiar with Python and can dedicate a server to run the worker and its dependencies.
It can use Redis, RabbitMQ, or Amazon SQS more on supported brokers here: https://docs.celeryproject.org/en/3.0/getting-started/brokers/index.html
6. Pros & Cons
Pros of Celery is that it’s a fast worker tool that works with multiple Message-Queue, suitable for the application-level worker solutions written in Python.
Cons is that it requires a server to run and has several dependencies.
Unlock the Cloud with Iron.io
Find out how IronWorker and IronMQ can help your application obtain the cloud with fanatical customer support, reliable performance, and competitive pricing.
